This is going to be a two part update - I've been doing a lot of stuff but just haven't taken the time to update the blog. Too many pictures for a single post, so I'll break it into two parts.
Installed the Skyview and D-10 in the panel so I could figure out where to run the wires. There is a large (37 pin) connector on the backside of the Skyview, as well as a couple of USB connections and 9 pin DSUB connectors for the network connections.
I need to find a place to put the EMS box and the ARINC box. Based on where the wires are going, it looks like the back side of the sub panel will be the best place.
I decided to put the ARINC box catty corner behind the center sub panel. Cut 2 holes for cables to pass through. The large one on the lower right is for the large Skyview connector. The smaller one is to bring the network connections from the ARINC and EMS boxes. I've got a Dynon network splitter that will allow connecting them together and will reach through to one of the DSUB connectors on the Skyview. If I haven't forgotten something, I won't need another hub. The connection from the hub in the back runs through the center passthroughs and will connect to the other network connection.
Finally was able to confirm that the plug in the top of the carb is for the temperature sensor, so I installed the carb temp sensor from the EMS sensor pack.
Since the tach info will come from the Emags, I need a cover for the tach attach point. Andair makes one, so I picked that up and installed it.
I've been putting off doing the final riveting on the canopy for nearly a year. Dreading possible cracking after reading all the problems people have had. I've left it clecoed for at least 6 months. Did a final check of everything and started riveting it with the pulled rivets.
It's really odd not to see all the clecoes sticking out any more. The part I was most worried about was the forward bend. I had a lot of problems getting it to fit when I first started working on it.
Finished and no cracks. Big sigh of relief.
Detail of the back . Pretty happy with how this came out.
Since I have to do something with the headset connectors before I go too far with wiring the radio stack, I decided to tackle where I was going to put these. I've seen a lot of good solutions, from just putting them in the lower left of the panel or on a subpanel on the lower flange, to putting them in the forward angled canopy deck. I've also seen them in the seat pans or back bulkhead behind the pilot/passenger. None of those really got the cables out of the way the way I wanted to.
Kent Stitt had his behind and below the panel on a small bracket. Really liked that solution, so I mocked it up from some scrap aluminum to see how that would look. I sat in the cockpit for several hours trying this out and decided to go this way, although I ended up moving the bracket above the horizontal angle instead of below as it is here.
I tried a couple of times to get satisfactory bends for these brackets, and couldn't produce anything I liked, so I picked up one of the cheap brakes at Harbor Freight. I fiddled around trying to make something and quickly realized anything I could cook up would cost as much or more than this and probably wouldn't be as good as this one.
The way this works is it's hinged in the middle and folds upward using the handles. There is a heavy steel (1/4" maybe) top piece that you can see sitting on the back top of the brake. The material you want to bend is placed between the top piece and the brake, with the bend line along the hinge line of the brake and clamped into place with c clamps or similar (not provided, but I have plenty). The top clamped piece has one edge milled to 90 degrees and another that's been milled at a bevel (20-30 degree maybe). I got the best bends with the bevelled edge.
Test bends. One is a factory angle, one is mine from scrap sheet. Nearly identical. One change I made later was to stick a long #40 drill bit against the bevel (on top of the material I'm bending). That created a nearly perfect radius on the bend.
Comparison of the factory angle and one I did. Mine is on the bottom.
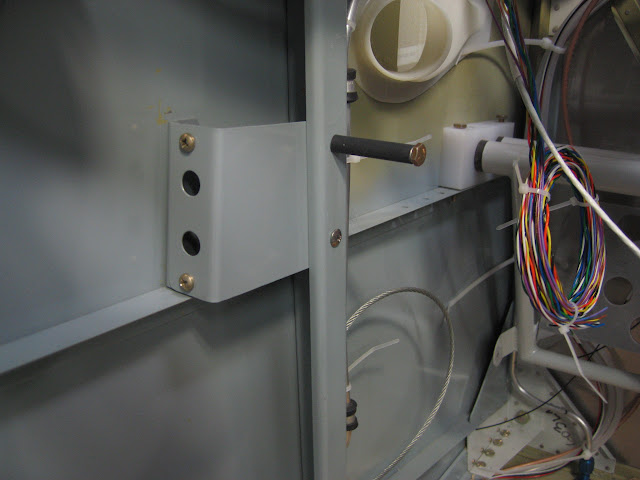
Here's the final headset bracket. I decided to make it in two pieces so I could remove it if needed. The edge that goes against the outside will be dimpled and riveted to the skin. Nutplates on ears will hold the larger piece. Back edge gets nutplates to attach to the stanchion.
Final product. I'll drill through the upright stanchion and the bracket to attach the back edge. A long top bolt at the top will make a nice headset hanger.
Picked up some lugs and insulating nipples from Stein for the larger wires.
Also picked up some of the Vertical power power connectors. These dudes are pricey.
Fabricated the #2 cable for the starter and ran it down the right side (#1 cylinder side) of the engine.
This was my first attempt at hooking up the manifold lines. Not at all happy with this. Way too many connections and just too cheesy. The manifold line from the #3 cylinder comes in from the left here, the two vertical tubes are for the Emags, and the right fitting on vertical manifold will go to the Dynon sensor.
I later called Tom Swearingen at TS Flightlines and had him make me up a long manifold line to just go the full distance from the cylinder to the vertical manifold. I can easily connect the Emags to the third hole using a tubing fitting later.
Marking the headset bracket for drilling to the stanchion and skin.
Painted and installed. There are nut plates on the bracket behind the stanchion. Used an AN3-22 bolt at the top with aluminum tube and heat shrink tube over it. Makes a nice holder for the headset.