Sunday, June 29, 2014

Sunday, June 29th, 2014. More canopy work - pretty much finished the slider frame and windscreen trimming.

Didn't work on Sunday.  Awesome weather so Becca and I headed to Busch to get our coaster fix.  We finally got to ride Verbolten.  I now have a new 2nd favorite ride.  Griffon is still the best, but Verbolten is a real kick.  Loved it.

I rearranged the canopy slide to drop the aft bow a bit for better alignment.  Had to slide it back maybe 3/8 to 1/2".  Much better fit.


From Finish Kit

Sides after tweaking the slide.  Dead even with the aft deck.


From Finish Kit

Once I was done with the initial fitting of the slider canopy, it was time to start on the windscreen.  Getting ready to trim the front edge.  Lot of trial and error here - the geometry is pretty weird with the curves of the forward skin and the plexi.  Hard to visualize what a cut is going to do.

From Finish Kit

Used my engine crate for a lot of the trimming.  The inside width was nearly perfect for the canopy to keep it from splaying out.  Made trimming much easier.

From Finish Kit

Test fit after some inital trimming.  Still have some big gaps on the sides, and the sides are too tall back toward the roll bar.

From Finish Kit

Right side marked for trimming.  Getting ready to trim about 1/2" off the lower edge and round the forward corner quite a bit.  Big cuts with the cutting wheel in an electrid drill - fine tuning with the belt sander and a 120 grit belt.

From Finish Kit

Getting close at this point.  Had to keep taping everything down and standing back to see the overall fit.

From Finish Kit

Getting ready to trim the edge where it butts up against the slider.  Easily done with a belt sander.

From Finish Kit

From Finish Kit

Test fit after trimming.  I left it at about 3/32" to 1/8".  If I get any tighter the plexi hits when I close the latch.  The gap will be covered with fiberglass later in any case.

From Finish Kit

Pretty close to done.

From Finish Kit

Had to add a couple of clips on the left and right sides to tighten the plexi down.  Otherwise a good fit everywhere else.


From Finish Kit

Gap is reasonable as well.

From Finish Kit

From Finish Kit

I used from scrap clips to lift the frame level with the windscreen so I could drill the rollers to the correct height.

From Finish Kit

Starting to work on the aft canopy attach blocks.  Pins in the aft frame socket into the UHMW plastic and hold it firm.

From Finish Kit

Sunday, June 22, 2014

Sunday, June 22nd, 2014 - more canopy work

Had a fair amount of stuff going on in the evenings this week, but did make some good progress anyway.  Got the plexi drilled to the frame, final fit the plexi in terms of sizing (or at least very very close).  Got the plexi countersunk for rivets, drilled the frame out to #30 and the plexi out to 5/32".  Match drilled the cap strip, and moved the rail to get a better fit of the aft bow to the fuse.

Just starting to drill the plexi to the frame.   Had the centerline marked already.  Laid out a pattern of rivet locations at 2" spacing per the plans.  Van's suggests putting masking tape on the frame, then by pressing on the plexi a line will appear and you can know where to drill.  It *does* work, but the line is very faint.  In hindsight I probably should have peeled away the vinyl along the line.


From Finish Kit
Working down the center bar.

From Finish Kit

Mandatory picture showing me drilling so the inspector can see that yes, I really did build this plane. :)


From Finish Kit

Finished with drilling the plexi to the frame.  Big sigh of relief.  I only had a couple of holes where I didn't hit my spot exactly.  Pretty happy overall.

From Finish Kit

You can't really tell, but this is after sanding down the aft edge a bit to clean it up and deburring it all.

From Finish Kit

Test fit.  I had the frame the perfect width when it was clamped, but drilling it all changed something and it's a bit snug again.  I'll try to take that back out.  Also noticed that now it's drilled the aft bow was a bit high.  I unclecoed the rail and slid it around until I had a better fit ( moving the slide rail will raise/lower the aft edge because of the ramp at the back).  I have to move the rail aft about 3/8".  I'll do that later once I've confirmed the exact amount.

From Finish Kit

Cutting the aft skirts to size.  Van's gives you a large sheet of .032 with a couple of patterns drawn on it with a black sharpie and you trim them out.  Mine were pretty faint and I wish I'd had a paper template.  That said, the were legible enough that I was able to darken the light lines enough to be able to trim by.

Basically these will get wrapped around the aft edge of the canopy and hang off the back to cover the cap between the aft part of the plexiglass bubble and the fuselage skin.

A lot of people end up making them out of fiberglass, but I'm not a huge fiberglass fan so I'm going to at least give the aluminum a chance.

From Finish Kit

You can't final trim the bottom edge of the plexi until the bubble has been match drilled and clecoed to the frame.  Even though it's tight when clamping, drilling and clecoing tightens it down even more.  The right side ended up needing no trimming at all.  I had to cut about 1/8" off the left side here.  I found it was easier to tip the whole frame up and leave it on the frame.  I backed the fore and aft bows with scrap aluminum so I wouldn't slip and cut the bows.  This was much easier and I didn't have to worry about somehow supporting the floppy canopy while I tried to trim it.


From Finish Kit

Here's what I think the final panel will look like.  Not the panel of my dreams, but it's what I think I can afford.  Dynon Skyview Touch (big screen in the middle).  Dynon D10 backup instrument on the left. Garmin 196 in an AirGizmo mount on the right, with an SL40 comm and VAL NAV 2000 below.  Garmin audio panel in the mockup but I'll probably use the Dynon.  I'd like an enroute IFR GPS, but that will have to wait.  What you can't see is the engine monitoring and transponder since they are all remote mounted.  The Skyview does have a WAAS GPS builtin, as well as a two axis autopilot. Incredible amount of capability here.

From Finish Kit

My solution to back drilling the cap strip.  Again, I didn't want to try to support the bubble or flip it over for risk of cracking it.  I clamped it to the frame slightly offset, then back drilled while I supported the hole with a scrap piece of wood, clecoing as I went.  Worked pretty well.


From Finish Kit

Here's the view from the inside.  I'd have tried the latch, but I haven't drilled the cap strip for the handle yet so I can't get it through there.  Overall it looks like a pretty good fit.  I need to grind/trim the front edge down so it's all uniform.

From Finish Kit

Looking aft.  I've lowered the aft bow too much at this point.  Needs to come up a bit.  Right now it's just sitting there and held with the allthread/nut.

From Finish Kit

Starting to countersink the plexi for the rivets/cap strip.

From Finish Kit

All the holes have been countersunk, frame enlarged to #30, canopy holes enlarged to 5/32" with a plexi bit and deburred.  The forward and aft edges have been final ground, deburred and beveled.

From Finish Kit
Trial fit getting ready to do the forward windscreen.  I've lowered the aft edge by moving the rail aft about 3/8" to 1/2".  The fit is very good at the back.  I'll start working on the windscreen next.

From Finish Kit

Sunday, June 15, 2014

Sunday, June 15th, 2014 - still working on the canopy, did some prep for mounting the engine, FWF kit arrived

Still working on the canopy trying to find a fit that seems like it will work.  I still don't like how far the bubble is off the forward frame.
Finally remembered to take a picture of Kent's plexi bits. I'd never seen any and they did not look like I expected. They do seem to work pretty well.
From Finish Kit

I did work on the width and got the frame down to the correct size so that when bubble is clamped to the frame, it rides in the rails nicely.

Trimmed and fit the canopy handle assembly to what looks like the final size.  I might have to take just a bit more off the inside tube to get it lined up well, but I can always take more off - can't add any back.  For now it looks pretty good.  I will need to remove some plexi from the forward edge of the bubble to get a good fit with the rollover bar and forward canopy, but I'll hold off on that until the bubble is finally attached to the sliding frame permanently.  For now it's close.

From Finish Kit


Did a test lift of the engine using a hand winch and a ceiling cleat.  It's strong enough, and it would work, but I wasn't wild about it.   It would probably work fine, but given the cost of the engine and how things can go wrong unexpectedly, I think I'll pass on that idea.

My finish kit arrived Saturday as well. There were a couple of deletions since I'm getting the exhaust straight from Vetterman (saves about $100). Also deleted the gascolator and a couple of other things.
Scat tube (that's the red corrugated tube on top) is for the heat muff and carb heat and anything else I might need it for. Fuel and oil lines on top - the red ones have fire shield on them. The big box at the bottom left is the baffle kit.

From Finish Kit

Spent a couple of hours inventorying the kit. At usual, Van's did a good job and everything was there.  This is some of the other stuff that was in the kit.  Battery box, alternator (Plane Power 60a unit) and the air box on the right.  One of the Lord mount boxes is on the left - these are special flexible mounts for the engine - two top and two bottom.

From Finish Kit

The other thing I got was another bottom skin for the left wing. A ladder fell in the shed where the wings are stored and dented the skin. Thankfully it didn't get anything else, but rather than try to fix it I decided to get a new one. :< 

I ran out to our chapter hangar Saturday night. We have a nice engine hoist that can be towed behind a vehicle.  I'll go that route and hope to hang the engine for the first time in the next week or two.

Had a couple of visitors Saturday.  Mike from across the street came by when I was final trimming ( or at least * *think* final trimming - you never know) the canopy sides, and Del Quisenberry and my Dad came by after dinner.  It's always interesting to hear people's comments - the most frequent is that they could never have the patience.  The funny thing is I don't either, I just happen to be motivated.  That's about what it boils down to - if you want something, you'll do what you need to do to get there.

Thursday, June 5, 2014

Sunday, June 8th, 2014 - Canopy

Haven't updated these in a while.  I've finally got the pictures uploaded and things have (slightly) settled down, so I'll try to do some updates of what's been going on, but for now I'm going to start with where I am.

Working on the canopy this week.  It is not going like I hoped it would.  I've been trying to find a good fit for a couple of weeks, and never did find a way of putting it in there that was even close to what I thought It should be.

I emailed Vans, talked to our local RV builders, looked at Kent's, etc.  Maybe this will work out ok and I just think it's too tight.  I finally took the best compromise fit I could, but it's not very good.

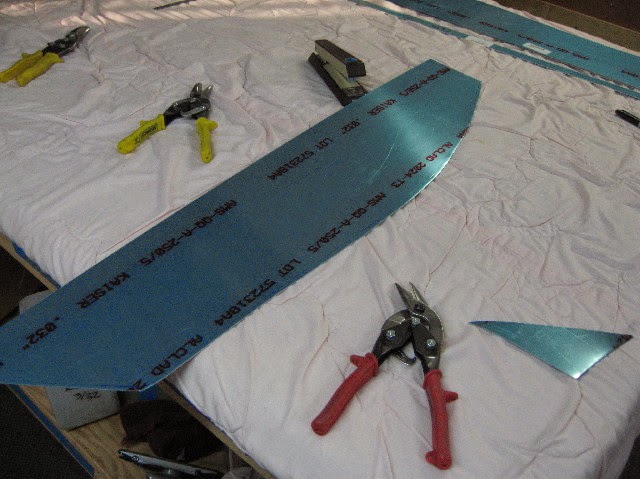
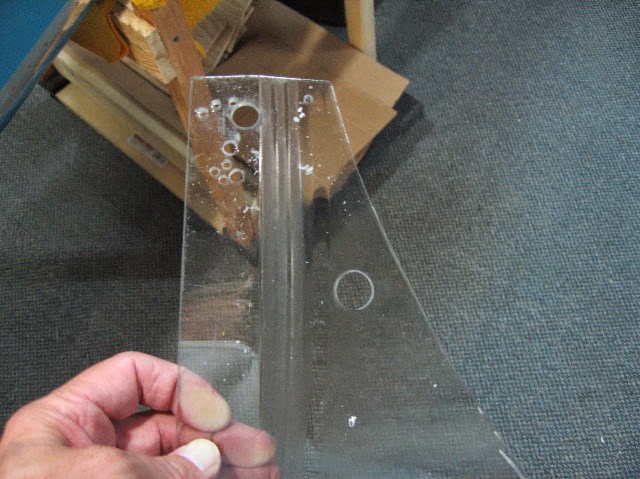
Did a bunch of practice cuts and holes. It isn't the hand grenade it is made out to be. I drilled more than a dozen holes with plain old drill bits, didn't push, and not a one cracked. I finally got it to crack by really leaning on it when I drilled with a #12 (which is how a lot of people drill all the time - try to pressure through rather than letting the bit cut). Anyway, after doing that I felt a lot better about the whole deal.  Here's some of my testing with a piece of scrap I trimmed off the other day.

From Finish Kit

I drilled the hole for the handle yesterday, then stared at it a long time and finally decided I had to cut it eventually, so I might as well just do it.  Made the "big cut" Wednesday night.

Here's the hole - borrowed Kent Stitt's plexi bits (I'll try to remember to take a picture - they did *not* look like I expected).  Drilled about a #30 to start, then enlarged with my small and large unibits, which cut it very cleanly.  No cracks.  5/8" hole to start.  It is actually too small.  Later I ended up going to 3/4" to get a good loose fit around the handle tube.

From Finish Kit

Once it was drilled I polished it with 220 & 400 sandpaper.

I don't have any pictures of the big cut - too busy and covered with plexi dust. Here are the results. 

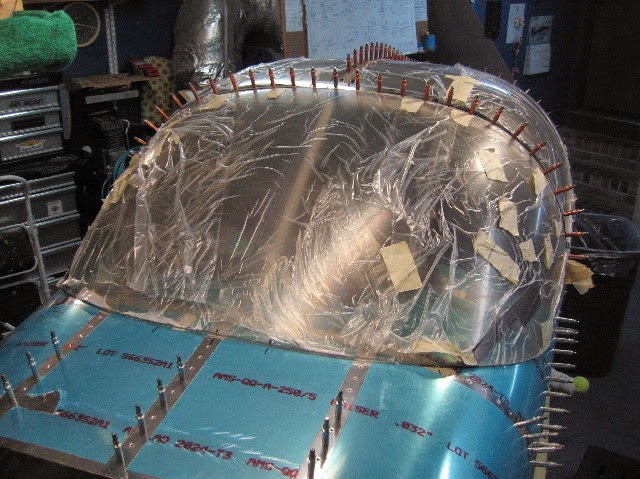
Forward canopy just after the big cut.

From Finish Kit

Sliding part of the canopy after I'd cut it and taken it off to set on the table.

From Finish Kit

This is later the next day when I'm starting to sneak up on the final trim by slowly working my way in.  I was also hoping that trimming more would help close up that awful forward gap, but I don't think it helped much.

From Finish Kit

Everyone had told me it would be much floppier after the cut, and indeed it was, but not in the way I wanted (and to be honest, I was 99% sure it wouldn't be).  I needed it to be floppier fore and aft.  It's floppier side to side.

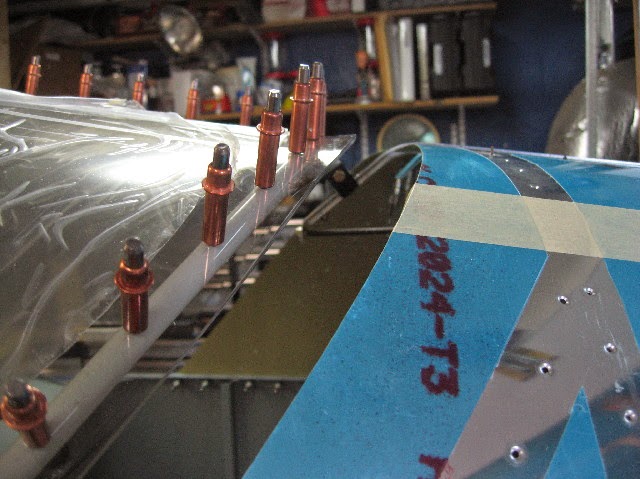
Here's the problem area without any clamping and with the aft bow snug but my no means tight.  This is the "natural" fit.  The problem is that either for center bow is bowed too much, or the canopy doesn't have enough curve (or - possibly - they all fit this way and people just clamp them down and go).

From Finish Kit

And this is with it lightly clamped after fiddling with it for 40 minutes or so trying to find the best fit after I'd done some trimming of the back and sides.  The gap is nearly 1/4".  No way a pulled rivet can span that gap even if it is shimmed.

From Finish Kit

I *can* by pulling on it tighten it down obviously.  It is alarmingly stiff side to side at the center - almost rigid.  It would be possible to clamp it tightly and work from the center down and probably get it to fit.  Seems way way way too tight though.

From Finish Kit
There's nothing I can really do but proceed with the process and hope for the best.  If the fit is really really horrible (it seems like it is to me) I will probably try to Sikaflex it simply because drilling it and pulling it down that far just seems way too likely to crack it.

From Finish Kit

I'm going to work on various clamping strategies and fitting over the next few days/week to see if I can find a fit that gets close enough to rivet.  We'll see.  The other possible hope is that by leaving it lightly clamped for an extended period in a warm/hot garage, it may conform to the shape of the frame more and start to fit better.  One can only hope.

Saturday I got about as frustrated as I've been with anything on this whole build.  I elongated the hole for the handle attempting to find a better fit, but no matter how hard I tried to keep it from drifting, as I tried to get everything more or less in a position where I could attach the plexi to the frame (by whatever method) due to the rocking action from the high spot on the center bar, it would drift out of alignment.  I must have tried at least a dozen times without success.


Elongated hole (just wrapped sandpaper around a highlighter - it cuts pretty quickly).  I was sitting next to an RV-6 guy at SNF and he mentioned his canopy cracked at 16,000 feet one day when it was really cold - he hadn't left enough room around the handle.  I will make sure I don't repeat his mistake.

From Finish Kit

I also tried clamping it fairly tightly and letting it get hot in the sun hoping it would "relax" (it did) but as soon as it cooled it went back to being too rigid.

From Finish Kit

After several hours of this I finally decided to try to fix the root problem. For whatever reason, either my canopy does not have enough arch in it, or the center bow of my frame is too arched, or both. The forward gap when the canopy was clamped to the aft bow was nearly an inch. I decided to reduce the height of the bow by clamping a long 2x4 which bridged the gap, then tightening it down until I'd cut it down some. I snuck up on it slowly, and took about 3/32 to 1/4 of an inch out. Made a *huge* difference.  I think I'll take out about another 1/8" - should be about perfect.

Once that was done, I started working on the width - as the plans mention, the plexi does indeed pull the frame wider.  I'm on about my 4th iteration of narrowing and nearly have it perfect.  If I take out about another 1/8" it should fit really well without slopping around.

Here's the fit after about 6 hours of the previous - aft bow lines up pretty well with the aft skins.


From Finish Kit
And the sides line up pretty well with the fuselage sides on both sides.
From Finish Kit
Another couple of hours of tweaking and it should be pretty nice. Then I'll clamp it down and trim some more.

Sunday, June 1, 2014

Sunday, June 1st - engine arrives! and VARFOF

The big news this week was my engine arrived.

 One of my goals at SNF was to narrow down and hopefully select an engine. It took me about 3 to 4 weeks after coming back to get all the quotes and sit down and compare them.

 I really was hoping to find a place that would let me assist in the build process. I found some good choices, but the problem was they ended up being very expensive because of transportation and some other costs.

 I finally decided to go with an Aerosport Power O-320. They had the best price by far, I talked to them a lot at SNF and they seemed like very decent folks. They answered all my questions promptly (not true for a lot of folks - one guy never did send me a quote after 3 requests and talking to him on the phone twice - he spent the whole time trying to convince me to buy something else that Van didn't recommend).

 Due to some shipping hiccups, the delivery was delayed a couple of weeks, but it finally arrived on 5/29. With some help from friends and my son, I got it home.

 Very nice looking engine. Superior XP O-320, carbureted, fixed pitch, with dual P-Mags. This engine has the roller lifters, so it should give very good life.  Also has the auto harness/adapters, so plugs will be much cheaper.  It can also use MoGas if I want.  1 year warranty after first start.

Now I need to get working on getting it mounted and all the stuff hooked up.

 Crate arrived in great shape after the 3000 mile trip from southwest Canada.

From Finish Kit


From Finish Kit

Crate opened up - engine is shipped with preservative oil and desiccant plugs as well as desiccant inside the bag.

From Finish Kit

Operators manual and specs, run in page and specs, as well as harness and a service kit for the P-Mags.

From Finish Kit

Side view with the crate sides removed.  Starter is a Skytech.  Engine is alodined.

From Finish Kit

Accessory housing end with the P-Mags.  Originally set up for a constant speed - that's what the hose is for.  It's been converted back to fixed pitch.

From Finish Kit