Can you say paperwork exercise? Nick said he had to sign less paper when he bought a house.
Note - Nick had to document nearly every serial number on this dude. Make sure you keep track or it may hold things up. I just spent a good bit of yesterday taking a picture of and writing down every serial number and part number I could find.
Bobby working on the inspection checklist. 8 pages (if I counted right) of things he has to make note of or in some way document. He said when he did his in 1974 it was only one page. :<
Everything on the aircraft was wide open so the DAR could get to everything. He probably spend the better part of 2.5 to 3 hours crawling around and looking at everything.
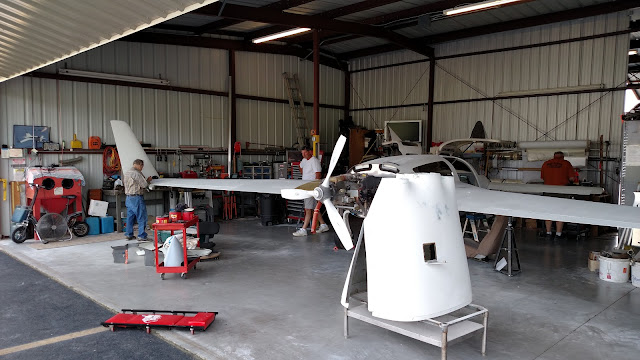 |
| From N10CN Nick and Connie's Velocity becomes an airplane |
Nick getting ready for the taxi inspection. To get to this point Roger, Nick Rodney and I spent about 45 minutes putting everything back together and making sure it was all secure.
 |
| From N10CN Nick and Connie's Velocity becomes an airplane |
The coveted piece of paper. Congrats guys. No squawks!
 |
| From N10CN Nick and Connie's Velocity becomes an airplane |
Back to working on mine.
I've been working to get most of the stuff forward of the firewall in accessible/reasonable locations so I can know where to put stuff behind the firewall (engine monitor, forest of ground tabs, etc). There's a lot of stuff forward that is either not included in the plans at all (Vans' being an advocate of day VFR only) or only vaguely specified.
I have full engine monitoring (CHT, EGT, manifold/oil/fuel pressure, oil/carb temperature, fuel flow, tach, volts/amps, etc. More than a dozen sensors, all of which require at least one wire and several have more than one. All that has to be wired and conveyed safely through the firewall. My take (we'll see how it goes) is to work backwards from the sensor towards the firewall, and then tie it all together.
At the moment I plan to bring nearly all of it through a 1" Safe-air stainless firewall penetration on the upper left side, but I want to get it in before I punch that hole through.
Prior to doing the sensors, a lot of immoveable (or nearly so) stuff needs to go in. Fuel lines, oil lines, exhaust, etc.
Installed the oil breather tube - basically a NAPA elbow hose connected to a fat curved aluminum pipe that takes the blow-by down to the lower cowl. The elbow has to be cut to fit, and a nutplate gets installed lower down to hold the tube in place.
 |
| From Finish Kit 2 |
Nutplate installed and tube trial fitted. I'm going to try to have it dump onto the exhaust to hopefully mostly burn it off and not foul the belly.
 |
| From Finish Kit 2 |
Exit end of the tube just above the exhaust. This will be moved/trimmed/angled later I'm sure.
 |
| From Finish Kit 2 |
Installed the oil and fuel pressure sensors on the manifold. Oil pressure is the upper and connects to a flow limiting AN fitting. Same deal for the fuel pressure sensor (lower), which tees off the output side of the engine driven fuel pump. The upper opening on the manifold will probably be used for manifold pressure plumbing.
 |
| From Finish Kit 2 |
Oil lines installed. The upper left blue fitting is input from the engine driven pump output side. The lower hose (kind of hidden behind the engine mount, which is the light grey powder coated tubes) goes back to the engine return fitting.
 |
| From Finish Kit 2 |
Installed the carburetor. The power coated bracket is secured between the sump and carb - sandwiched by gaskets on either side. The bracket provides a secure mounting location for the mixture and throttle cables, which have not been connected yet. Throttle is upper left, mixture is below it.
 |
| From Finish Kit 2 |
I called Aerosport Power and ordered a cover for the governor mounting (it's a special part of course). I also went ahead and ordered the primer lines since I really don't like the copper ones I got from Van's.
 |
| From Finish Kit 2 |
When we were doing the annual on our Cherokee we had to do the crank inspection A/D and removed the crank plug. :) Yet another case of fortuitous timing. I had to do the same exact procedure to make sure my engine was set up for fixed pitch per Lycoming SI 1435.
To do that you have to pull the plug in the end of the crankshaft - punch a hole in it and remove it. This is what it looked like.
Note: make sure you have a bucket or something under the hole! :) Guess who didn't? There isn't a lot of oil in there, but when it's running on the garage floor it sure seems like a lot.
 |
| From Finish Kit 2 |
So guess what was at the back? An unpierced plug. Glad I didn't trust the guy that set it up - if you don't relieve the pressure it will blow out the crank plug and all your oil with it.
I didn't have a long enough punch to safely reach the plug, so I rigged up a rube goldberg solution using a short punch with a hex head on it, a 1/4" socket extension and matching socket and a lot of tape to keep it from coming adrift.
 |
| From Finish Kit 2 |
There is a tube inside that conducts the oil in from the pressure side of the governor - do *not* damage this dude. If you do it's teardown time and a lot of $$$.
 |
| From Finish Kit 2 |
Here's the finished product. Note - some plugs have an allen screw and you just back it out. Seems like a no brainer, but mine didn't have that in spite of it being brand new. Our 40 year old Cherokee did though. Go figure.
 |
| From Finish Kit 2 |
Picked up an ANL fuse block (below) last week for the alternator feed line. The upper part with the heavy copper fittings is the Dynon ammeter shunt. They go in series on the alternator output cable.
 |
| From Finish Kit 2 |
I plan on mounting those right below the batter and battery contactor - it's open real estate, isn't in the way, and the runs are very close so I can just use heavy copper jumpers for the connections.
 |
| From Finish Kit 2 |
Nutplates installed and the fuse block and shunt bolted to the firewall. |
| From Finish Kit 2 |