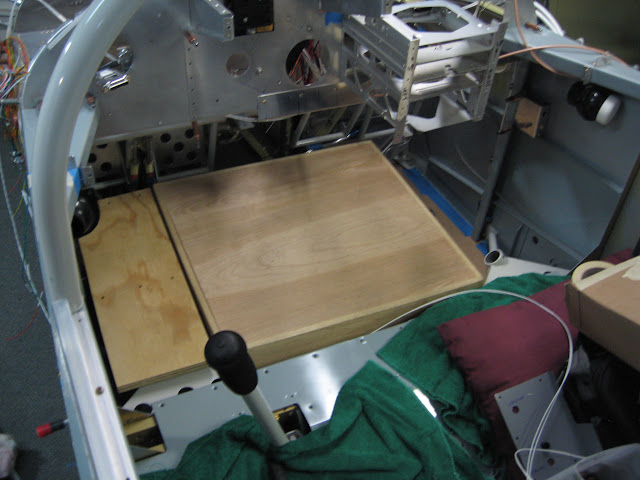
I've been wanting to come up with something that will allow me to lay down under the panel semi comfortably rather than bend backwards onto the floor. If nothing else this would be handy for when I have to rivet the forward top skin. I decided to see if it was possible since I wasn't sure if I got it level if I'd fit in the remaining space.
I have a couple of stands I've been using that are about 7" high that once again came in very handy. One of them was just about the perfect height and nicely straddled the center section where the wiring and fluid lines go. I fabbed up a small shoebox sized stand to fill the gap on the side and this was the result. Covered it with a sheet of cardboard and put a small blanket over it and it worked great. It's very tight, but will probably serve well for riveting.
 |
| From Finish Kit 2 |
On my last order from Aircraft Spruce I picked up some grommet edge. I'd been making my own out of split nylon tubing - worked ok but I really wasn't too happy with it. This stuff is great - it has a metal core that is very grippy and will not come out. This is the passthrough for the Dynon D10.
 |
| From Finish Kit 2 |
Passthrough for the Skyview connector gets the same treatment. The black box on the back side is the Dynon ARINC box.
 |
| From Finish Kit 2 |
While I was at it I installed an 8 slot fuse block. There weren't enough CBs in the VPX sport to handle every connection, but the VPX Pro was overkill for me. The solution is to hang a fuse block off of one appropriately sized CB on the VPX, then size the fuses in the block for the various loads. This will power non essential items like panel lights, primer solenoid, etc.
 |
| From Finish Kit 2 |
Installed a molex connector on the flap power lines to allow removal if necessary.
 |
| From Finish Kit 2 |
Detail of the other end of the connector.
 |
| From Finish Kit 2 |
Safetied the flap pushrod to the bolt per the plans. Hopefully this will be the last time I will put this together.
 |
| From Finish Kit 2 |
Enlarging the hole in the fuel selector bracket to accept the Andair fuel selector.
 |
| From Finish Kit 2 |
This is what the Andair fuel selector valve looks like. Really high quality unit. The fittings are clockable and are available in a wide variety of sizes and types. I'm installing the nutplates. The holes for the nutplates as well as the dimples are all pre-machined. The slots in the center section are where the lockout button goes. You *cannot* turn this valve off by accident. There is a spring loaded pin on the handle that has to be positively lifted and then the handle turned. The single hole on the back center is the hole for the locked off position.
 |
| From Finish Kit 2 |
There is a pre-drilled and labeled trim piece that fits on top of the selector mount. Used it to mark out the holes for drilling.
 |
| From Finish Kit 2 |
Detail of the fittings. O-rings on the inside give a positive seal, and the allen screws are staked after tightening to ensure they don't back out.
 |
| From Finish Kit 2 |
Running the pitot heat and landing light wires to the terminal block under the pilot's seat. The left side passthrough is so full you can't get one more wire through it, so these will run through the center. Still have a bit of room on that one. Hopefully it's enough.
 |
| From Finish Kit 2 |
It may not seem like it, but I'm actually making progress. I think I've pretty much figured out where everything will go and how it will be routed, so now I'm starting to tie off the unused wires, then run and terminate the grounds. The final bit will be to terminate the power lines.
 |
| From Finish Kit 2 |
I got a note from Amy at Flightline that she's done with my seats. I should be getting those and the carpet from her early next week. :) Looking forward to seeing what they look like.